什么是Python GIL?
什么是解释器?
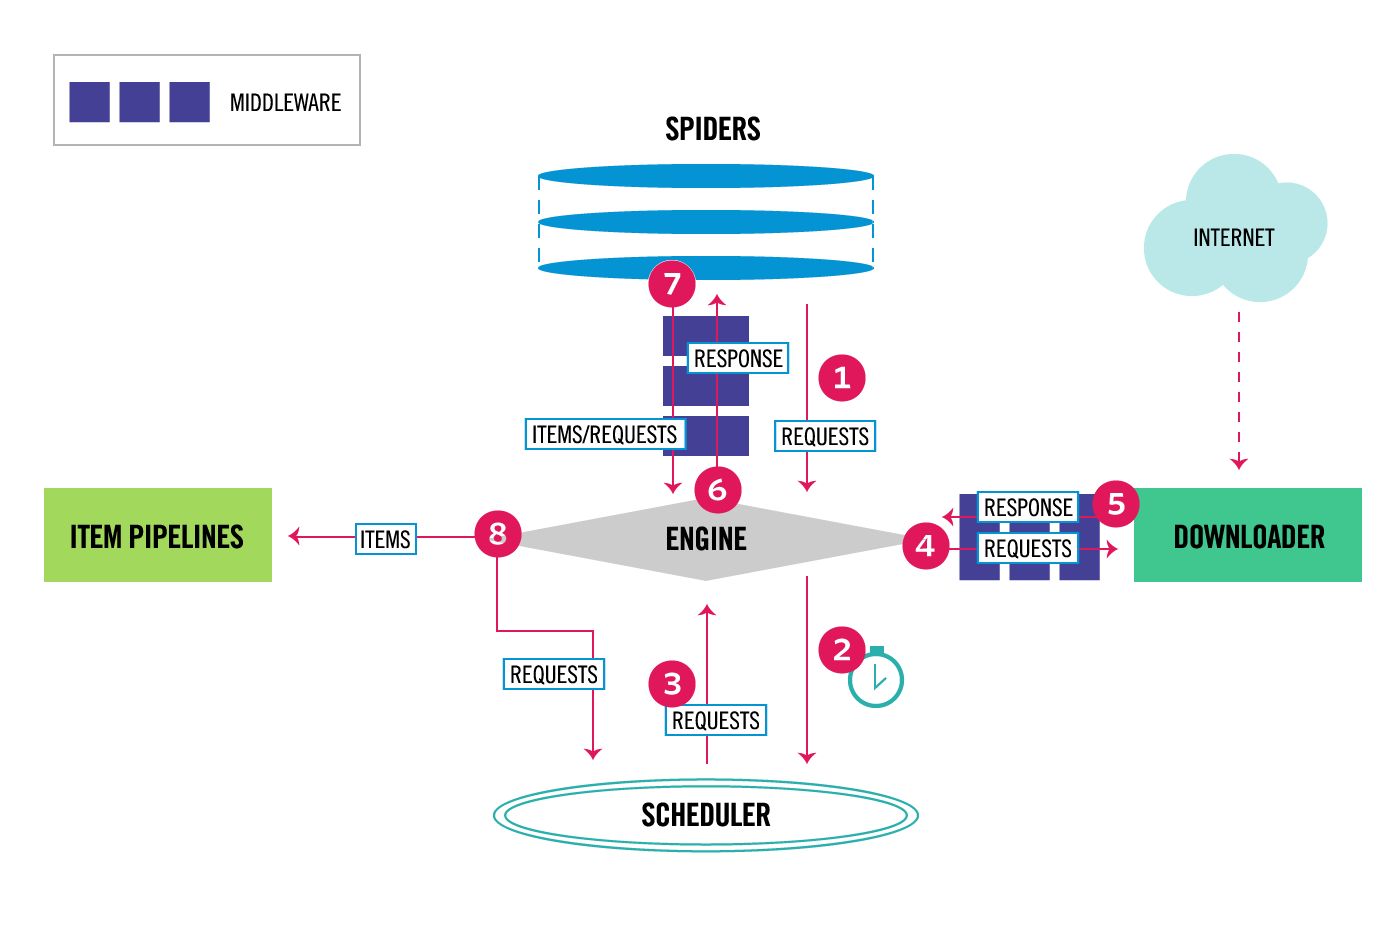
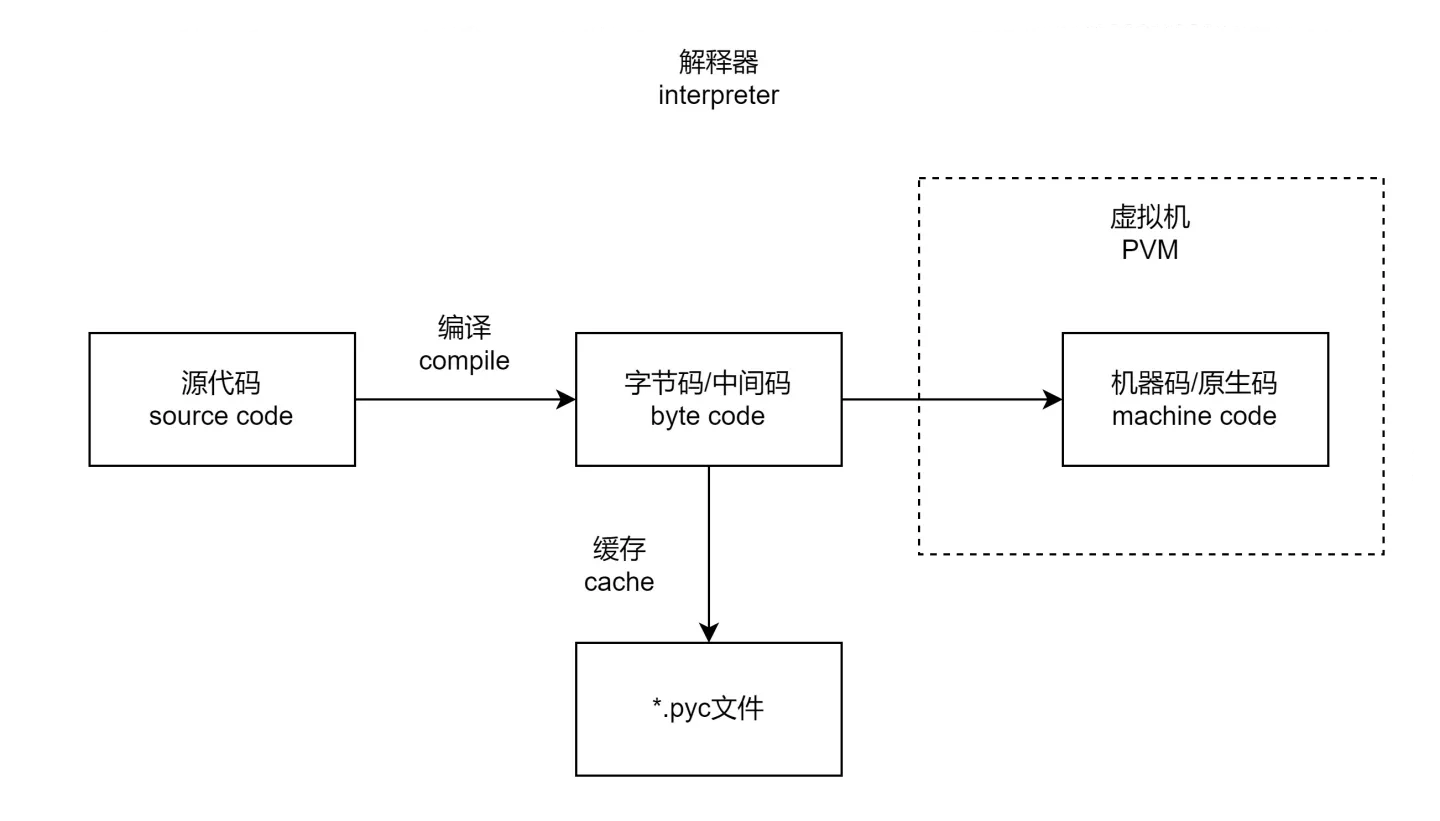
Python作为一门解释性语言,先把源代码编译为字节码,再放进虚拟机中执行,整个过程是由解释器执行并完成的。类似的还有JavaScript和PHP等。
但是解释器并不是只有一种,官方的解释器是基于C语言开发的CPython。但是除了CPython,还有基于Java实现的Jython、基于R 语言实现的RPython等等。
什么是GIL?
GIl 是一种互斥锁
什么是互斥锁?
在编程中,引入了对象互斥锁的概念,来保证共享数据操作的完整性。每个对象都对应于一个可称为” 互斥锁” 的标记,这个标记用来保证在任一时刻,只能有一个线程访问该对象。
当多个线程几乎同时修改某一个共享数据的时候,需要进行同步控制。
线程同步能够保证多个线程安全访问竞争资源,最简单的同步机制是引入互斥锁。
互斥锁为资源引入一个状态:锁定/非锁定
某个线程要更改共享数据时,先将其锁定,此时资源的状态为“锁定”,其他线程不能更改;直到该线程释放资源,将资源的状态变成“非锁定”,其他的线程才能再次锁定该资源。互斥锁保证了每次只有一个线程进行写入操作,从而保证了多线程情况下数据的正确性。
为什么会产生GIL?
GIL的产生是因为CPython的内存管理不安全
In CPython, the global interpreter lock, or GIL, is a mutex that protects access to Python objects, preventing multiple threads from executing Python bytecodes at once. The GIL prevents race conditions and ensures thread safety. A nice explanation of how the Python GIL helps in these areas can be found here. In short, this mutex is necessary mainly because CPython’s memory management is not thread-safe。
在CPython中,GIL是一个互斥锁,它在任一时刻只允许一个线程对字节码进行执行。这样避免了竞争危害,从而保证了线程安全。简单来说就是,互斥锁之所以存在是因为CPython的内存管理不是“线程安全的”。
由此Python的官方文档可知, 因为因为CPython的内存管理不是“线程安全的”, 所以需要互斥锁, 那么自然会引出另外两个问题。
GIL的产生是因为CPython的内存管理不安全
为什么CPython的内存管理不安全?
Python 第一次发布是在 1991 年,当时的 CPU 都是单核,单核中,多线程主要为了一边做IO,一边做 CPU 计算而设计的,Python 编译器是由 C 语言编写的,因此也叫 CPython,那时候很多编程语言没有自动内存管理的功能,为了实现自动垃圾回收,Python 为每一个对象进行了引用计数,当引用计数为 0 的时候说明该对象可以回收,从而释放内存了,比如:
>>> import sys
>>> a = []
>>> b = a
>>> sys.getrefcount(a)
3
这里 a对象就有 3 个引用,
- 一个是本身,
- 一个是变量 b,
- 一个是 getrefcount 函数的参数,
如果此时又有一个线程引用了 a,那么引用计数再增加 1,如果某个线程使用了 a 后运行结束,那么引用计数就减少 1,多线程对同一个变量「引用计数」进行修改,就会遇到 race conditions(竞争)。
怎么解决内存管理不安全的问题?
为了避免 race conditions,最简单有效的办法就是加一个互斥锁。但如果对每一个对象都加锁,有可能引发另一个问题,就是死锁,而且频繁的获取和释放会导致性能下降。
所以至此, 最简单有效的方法就是加一个解释器锁,线程在执行任何字节码时都先获取解释器锁,这就避免了死锁,而且不会有太多的性能消耗。当时 CPU 都是单核,而且这种 GIL 设计简单,并不会影响性能,因此一直沿用至今天。GIL 存在最主要的原因,就是因为 Python 的内存管理不是线程安全的,这就是 GIL 产生并存在的主要缘由。

互斥锁的代码实例
threading模块中定义了Lock类,可以方便的处理锁定:
# 创建锁
mutex = threading.Lock()
# 锁定
mutex.acquire()
# 释放
mutex.release()
- 如果这个锁之前是没有上锁的,那么acquire不会堵塞
- 如果在调用acquire对这个锁上锁之前,它已经被 其他线程上了锁,那么此时acquire会堵塞,直到这个锁被解锁为止
互斥锁在for循环外面
import threading
import time

# 定义一个全局变量
g_num = 0


def test1(num):
 global g_num
 # 上锁,如果之前没有被上锁,那么此时 上锁成功
 # 如果上锁之前 已经被上锁了,那么此时会堵塞在这里,直到 这个锁被解开位置
 mutex.acquire()
 for i in range(num):
     g_num += 1
 mutex.release()   # 解锁
 print("-----in test1 g_num=%d----" % g_num)


def test2(num):
 global g_num
 mutex.acquire()   # 上锁
 for i in range(num):
     g_num += 1
 mutex.release()   # 解锁
 print("-----in test2 g_num=%d=----" % g_num)


# 创建一个互斥锁,默认是没有上锁的
mutex = threading.Lock()


def main():
 t1 = threading.Thread(target=test1, args=(1000000,))
 t2 = threading.Thread(target=test2, args=(1000000,))

 t1.start()
 t2.start()

 # 等待上面的2个线程执行完毕....
 time.sleep(2)

 print("-----in main Thread g_num = %d---" % g_num)

if __name__ == "__main__":
 main()

#-----in test1 g_num=1000000----
#-----in test2 g_num=2000000=----
#-----in main Thread g_num = 2000000---
互斥锁在for循环里面
import threading
import time

# 定义一个全局变量
g_num = 0

def test1(num):
 global g_num
 for i in range(num):
     mutex.acquire()  # 上锁
     g_num += 1
     mutex.release()  # 解锁

 print("---test1---g_num=%d"%g_num)

def test2(num):
 global g_num
 for i in range(num):
     mutex.acquire()  # 上锁
     g_num += 1
     mutex.release()  # 解锁

 print("---test2---g_num=%d"%g_num)

# 创建一个互斥锁
# 默认是未上锁的状态
mutex = threading.Lock()

# 创建2个线程,让他们各自对g_num加1000000次
p1 = threading.Thread(target=test1, args=(1000000,))
p1.start()

p2 = threading.Thread(target=test2, args=(1000000,))
p2.start()

# 等待计算完成
while len(threading.enumerate()) != 1:
 time.sleep(1)

print("2个线程对同一个全局变量操作之后的最终结果是:%s" % g_num)
# ---test1---g_num=1909909
# ---test2---g_num=2000000
# 2个线程对同一个全局变量操作之后的最终结果是:2000000
上锁解锁过程
- 当一个线程调用锁的acquire()方法获得锁时,锁就进入“locked”状态。
- 每次只有一个线程可以获得锁。如果此时另一个线程试图获得这个锁,该线程就会变为“blocked”状态,称为“阻塞”,直到拥有锁的线程调用锁的release()方法释放锁之后,锁进入“unlocked”状态。
- 线程调度程序从处于同步阻塞状态的线程中选择一个来获得锁,并使得该线程进入运行(running)状态。
锁的好处
- 确保了某段关键代码只能由一个线程从头到尾完整地执行
锁的坏处
- 阻止了多线程并发执行,包含锁的某段代码实际上只能以单线程模式执行,效率就大大地下降了
- 由于可以存在多个锁,不同的线程持有不同的锁,并试图获取对方持有的锁时,可能会造成死锁。
死锁代码实例
import threading
import time


#创建互斥锁
lock = threading.Lock()


#根据下标去取值, 保证同一时刻只能有一个线程去取值
def get_value(index):

    # 上锁
    lock.acquire()
    print(threading.current_thread())
    my_list = [3,6,8,1]
    # 判断下标释放越界
    if index >= len(my_list):
        print("下标越界:", index)

        return
    value = my_list[index]
    print(f'值是:{value}')
    time.sleep(0.2)
    # 释放锁
    lock.release()


if __name__ == '__main__':
    # 模拟大量线程去执行取值操作
    for i in range(30):
        sub_thread = threading.Thread(target=get_value, args=(i,))
        sub_thread.start()
出现死锁的情况, 程序无法正常停止, 一直在等待
<Thread(Thread-1, started 30364)>
值是:3
<Thread(Thread-2, started 27120)>
值是:6
<Thread(Thread-3, started 29632)>
值是:8
<Thread(Thread-4, started 29988)>
值是:1
<Thread(Thread-5, started 20984)>
下标越界: 4
避免死锁的代码示例
# 在合适的地方释放锁
import threading
import time

#创建互斥锁
lock = threading.Lock()


#根据下标去取值, 保证同一时刻只能有一个线程去取值
def get_value(index):

    # 上锁
    lock.acquire()
    print(threading.current_thread())
    my_list = [3,6,8,1]
    if index >= len(my_list):
        print("下标越界:", index)
        # 当下标越界需要释放锁,让后面的线程还可以取值
        lock.release()
        return
    value = my_list[index]
    print(value)
    time.sleep(0.2)
    # 释放锁
    lock.release()


if __name__ == '__main__':
    # 模拟大量线程去执行取值操作
    for i in range(10):
        sub_thread = threading.Thread(target=get_value, args=(i,))
        sub_thread.start()
<Thread(Thread-1, started 30336)>
3
<Thread(Thread-2, started 5920)>
6
<Thread(Thread-3, started 28308)>
8
<Thread(Thread-4, started 27324)>
1
<Thread(Thread-5, started 26840)>
下标越界: 4
<Thread(Thread-6, started 30104)>
下标越界: 5
<Thread(Thread-7, started 28900)>
下标越界: 6
<Thread(Thread-8, started 2676)>
下标越界: 7
<Thread(Thread-9, started 28912)>
下标越界: 8
<Thread(Thread-10, started 30068)>
下标越界: 9

Process finished with exit code 0
最后, GIL导致了什么结果?
正面
解决安全问题。
负面
单线程CPU消耗
约16% (i5 11代)
import threading

def dead_loop():
    while True:
        pass
dead_loop()
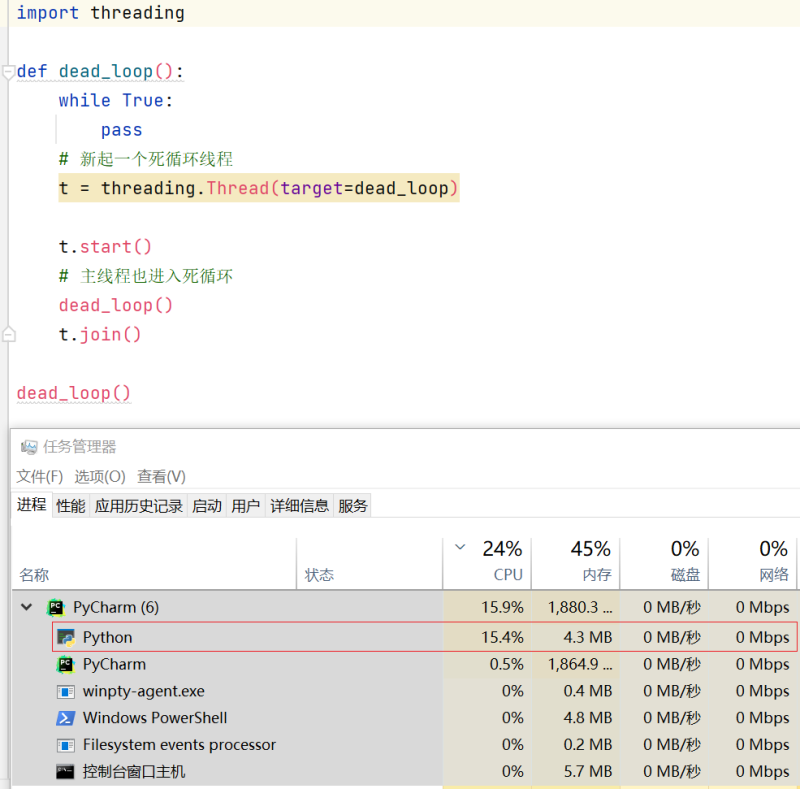
双线程CPU消耗
仍然约16%, 而不是32%。
import threading

def dead_loop():
    while True:
        pass
    # 新起一个死循环线程
    t = threading.Thread(target=dead_loop)

    t.start()
    # 主线程也进入死循环
    dead_loop()
    t.join()

dead_loop()
结论:
- 当双线程时, Cpython 缩小好的CPU的资源, 和单线程时一致。
- Cpython 当前只能运行一个GIL线程。
如果再更进一步, 尝试十个或N个线程, Python的CPU利用率仍然不变。
但是用C、C++或Java来改写相同的死循环,直接可以把全部核心跑满,为什么Python不行?正是GIL。
Python的线程虽然是真正的线程,但解释器执行代码时,有一个GIL锁:Global Interpreter Lock,任何Python线程执行前,必须先获得GIL锁,然后,每执行100条字节码,解释器就自动释放GIL锁,让别的线程有机会执行。这个GIL全局锁实际上把所有线程的执行代码都给上了锁,所以,多线程在Python中只能交替执行,即使100个线程跑在100核CPU上,也只能用到1个核。
在Python中,可以使用多线程,但不要指望能有效利用多核。如果一定要通过多线程利用多核,那只能通过C扩展来实现,不过这样就失去了Python简单易用的特点。
不过,也不用过于担心,Python虽然不能利用多线程实现多核任务,但可以通过多进程实现多核任务。多个Python进程有各自独立的GIL锁,互不影响。
其它
- 对于 “Python的GIL” 这种表述是不够严谨, 但也不算错。
- GIL是相对于Cpython 解释器而言, 而不是Python 语言。
- Cpython是用来解析Python代码.
- Cpython是目前最流行的, 主流的解释器.
最后, 只要你愿意, 你可以自己开发一个没有GIL的解释器.